
Doors
Standard doors (or those which do not feature remarkable linedefs and/or which are assigned a typical door texture) are for the most part used scarcely in Doom. Doors which require keys, lead to secret areas or are activated by shootable switches or walkover lines are to be considered exceptions to this generalization as they typically do little to disrupt the fluidity of gameplay. Doors serve more toward area segregation and combat control than as aesthetic dividers, and are used to grant the player easier navigation and time to either prepare or contemplate before entering the next room. As is often the case, this somewhat liberal use of doors allows the mapper to create a contrast in design between rooms separated by doorways, lending to some interesting shifts both visually and in terms of gameplay.
Here’s a selection of maps from each episode that we may use to illustrate door use, as well as a general overview on how doors are used between episodes:
Knee-deep in the Dead:
Of the three episodes, Knee-deep in the Dead uses regular doors the least. Most areas are separated by shifts in height or direction, which differs greatly from the slightly more uniform layout of maps in The Shores of Hell, and to a lesser extent Inferno. However, there is still a great deal that may be learned from the study of door use in E1. E1M3, 4 and 7, for example, all place the player in a room isolated from the rest of the level by a standard door.
E1M1
The first and only standard door (if we choose to exclude the exit for its being canon) allows the player to prepare before encountering the first monster in the game. It is expected that the player is still getting to grips with the controls of the game at this stage, and having a door here gives the player time to set his priorities and make the game move at his pace. Since M1 is a small and linear map, the function of the door could be seen as similar to those used in E3M1 for example, which is equally a one-way street. Doors cannot really obstruct the flow here as they are passed through only once (see M7 below for further examples).
E2M1, if we are to take the final M1 counterpart, is an also linear map which introduces teleporting to the player, and so the role of the door as a means of compartmentalizing and segregating areas is somewhat usurped, or at the very least expanded upon.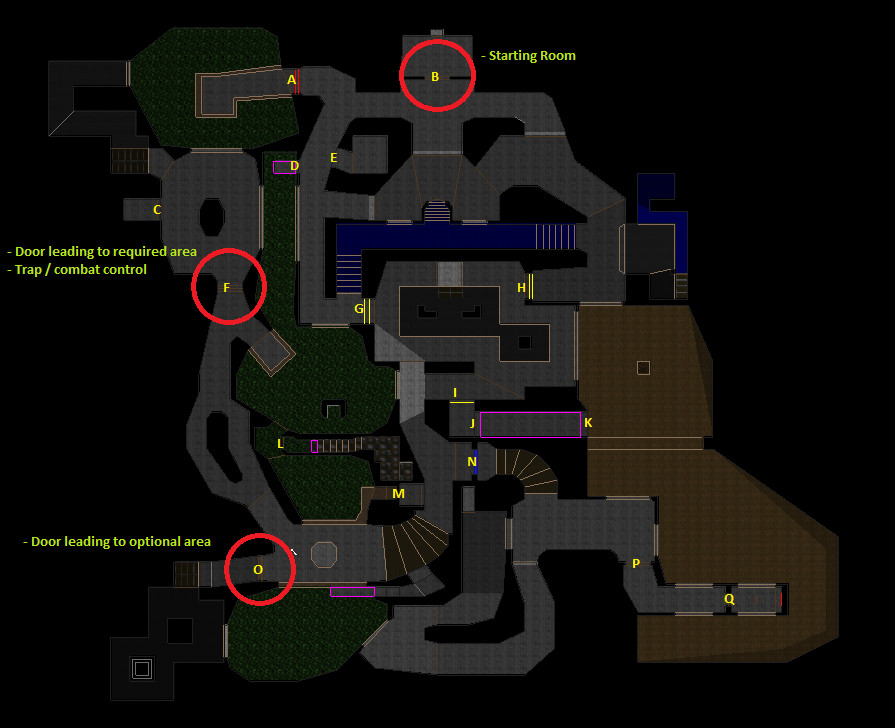 E1M7
E1M7
At the opposite end of the episode is E1M7, which interestingly features only 3 standard doors of 17 in being perhaps the second most sophisticated level in the episode after M6.
The use of all three keys and a considerable amount of backtracking makes the use of doors particularly interesting. The lowermost door indicated [O] leads off to an optional area of the map which is not reachable via any other means, while the centremost door indicated [F] similarly leads off to a segregated area, but one to which a visit is deemed necessary for the player to complete the level. With the first example we might accept that the player will be unlikely to return to the southwest part of the map, and so the use of a door helps familiarise the player with the area beyond it through compartmentalization. Similarly with the second example, the centremost regular door (which stays open), the player is unlikely to visit the northwest portion any more than once, the red key having been obtained. Between these two doors however and elsewhere in the level the player is quite likely to revisit areas more than just once for both access and explorative purposes. The rising pillar, for example, gives the player access to the flanking slime pits in which multiple secrets reside, while the overlook closer to door F surveys these accessible areas.
The topmost door indicated [.B], just as with M3 and 4, allows the player a moment of collection, as well as a chance for the music to intimidate the player!
Other doors:
- Doors [E] and [I] are trap doors which are located in areas that see heavy traffic. Door [C] is an exception to this, as the player is likely to only pass by the one time, but critically, all three examples occur in somewhat unpredictable locations, rather than immediately behind the player following the collection of the yellow or red keys, for example.
- [L] is a rather interesting door that can probably be certified in being aesthetic rather than practical. Note the unique switch rather than door texture here.
- Door [J] is located within a trap location. The player is rewarded by exploring new facets of the level as they open up, however small.
- [P] is a remotely controlled door.
- As with all other maps in the episode bar the final one, door [Q] is the signature exit door leading to the “airlock” or “exit chamber”.
The Shores of Hell:
Doom’s second episode is where doors are first seen being used in drastically different ways, no doubt as a by-product of Petersen’s mapping style. Whereas Romero’s door deployment is more precise and controlling, Petersen’s is a great deal more haphazard, if not impossible to deduce. If you’re mapping for The Shores of Hell, you could probably get away with a great deal more in this department than you might in the first, and even in the third episode.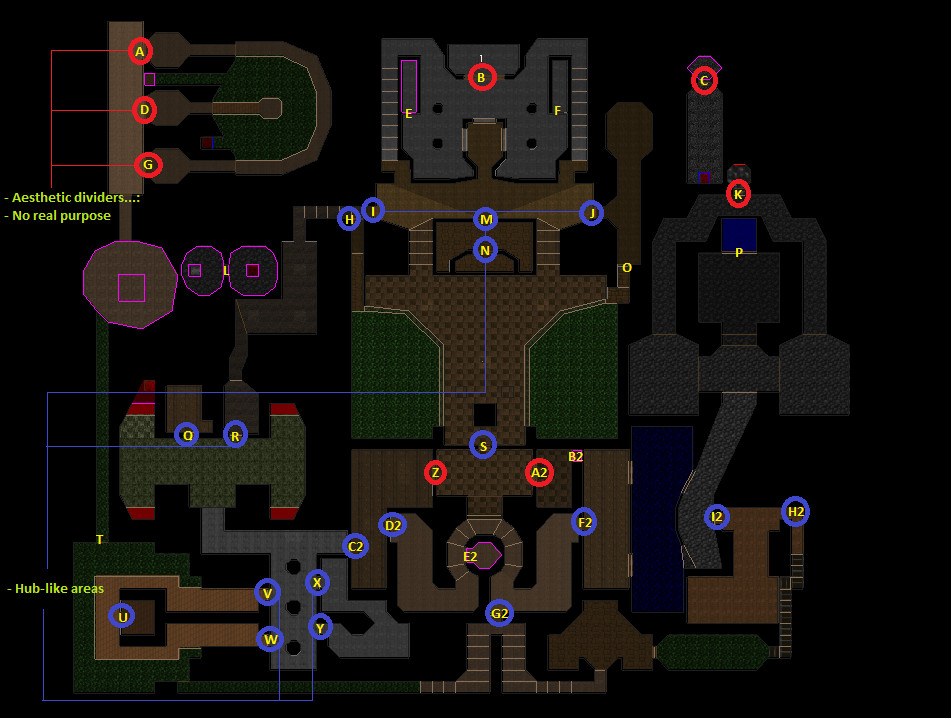 E2M5 & E2M6
These two maps, fortunately, have a very distinct procedure when it comes to door placement, in that they both feature very tightly framed doorways that branch off from a central passageway or area. The below diagram indicates, as before, the whereabouts of all the standard doors (those without remarkable linedefs and which are not secret related), but also the use of standard doors using a switch texture as indicated by the blue circle; a trend which is largely omitted in other maps of the game (E2M7, E3M3 and E3M5 sees some semblance of this style return, but it is here that the epitome resides!).
An astounding 35 doors in E2M5 sees the player drawing to a halt almost every couple of paces, and at first glance the whole setup can seem sort of chaotic. However, there is a great deal of order to the door arrangement here both stylistically and with relation to gameplay.
You will notice that a few of the doors lead to areas that, unlike E1M7, are not accessible only from one direction. Indeed, there are still many that do (such as with [M], [J], [Q], [A2] and [F2]), but there is a great deal of connectivity here, regardless of most entrance and exit points being located just feet from one another. Doors [A] and [G], [V] and [W], and [X] and [Y] all lead to looped pathways/areas, giving a stronger sense of perceived non-linearity, and many others such as [I] and [R] or [H2] and [I2] are linked via distinct, feature filled areas. A key thing to take note of here is that even the passageways are detailed. In addition, many of the blue circled doors (those which have a switch texture) branch off from hub-like areas.
With regards to gameplay, it is plausible to suggest that the doorways were used as a means to encourage the player to go exploring. While vast tracts of secret area are stowed away in the northwest of the map in a place which is everything but compartmentalized, there’s a great deal of goodies stashed behind closed doors.
Other doors:
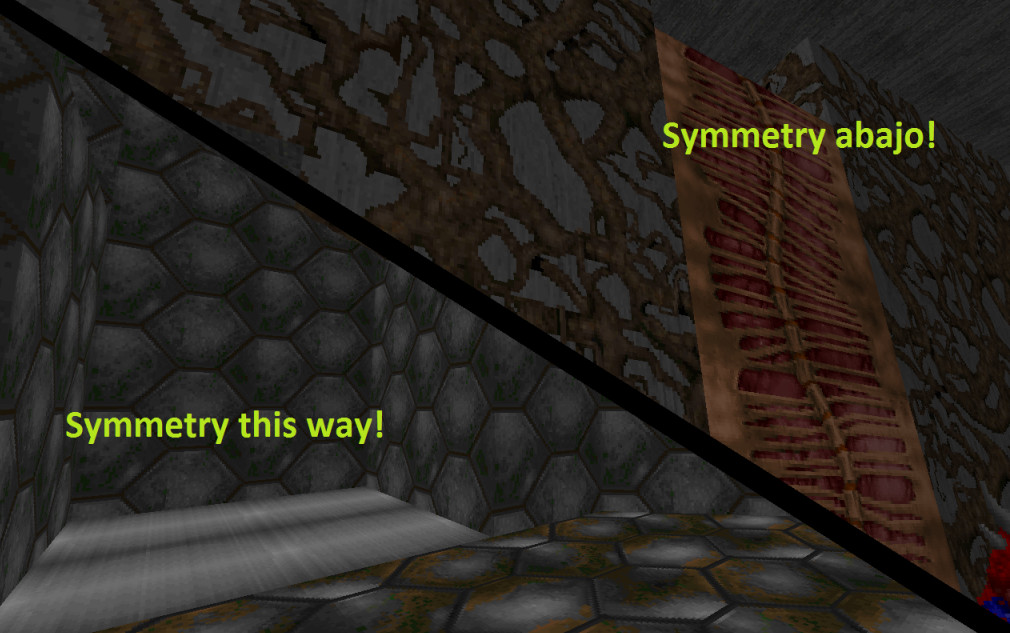
- Door [T] is less so a door than it is a lengthy passageway that functions as a door in its entirety. Though the placement of the door-passage itself is purposed with hiding a secret area, the effect that is created might be considered wholly aesthetic.
- Doors [Z] and [A2] are placed symmetrically opposite each other, but [A2] leads to an area of questionable significance. In this case, the map’s symmetry takes priority over any indication of where to go, and is further indication that the doors here serve solely to compartmentalize rather than control combat.
Inferno:
For the most part, the use of doors as presented in E2 is replicated here, but a decrease in orthogonal design and an increase in abstract shaping sees substantially less intricate compartmentalizing of the sort seen in E2M5 and conversely more focus on the aesthetic - though not obstructive - and the experimental. Those who are mapping for E3 should seek to consolidate the flow retention seen in E1 with the more abstract or even gimmicky qualities of E3 maps such as Limbo’s gate system, Cathedral’s patterned layout, or Slough of Despair’s severed hand...
E3M1
As was mentioned with E1M1, E3M1 is a linear map that employs a many doors of which are passed under only once. There’s not an awful lot to say about this one except that it affirms an increase in standard door permissibility where linearity is descriptive of level progression.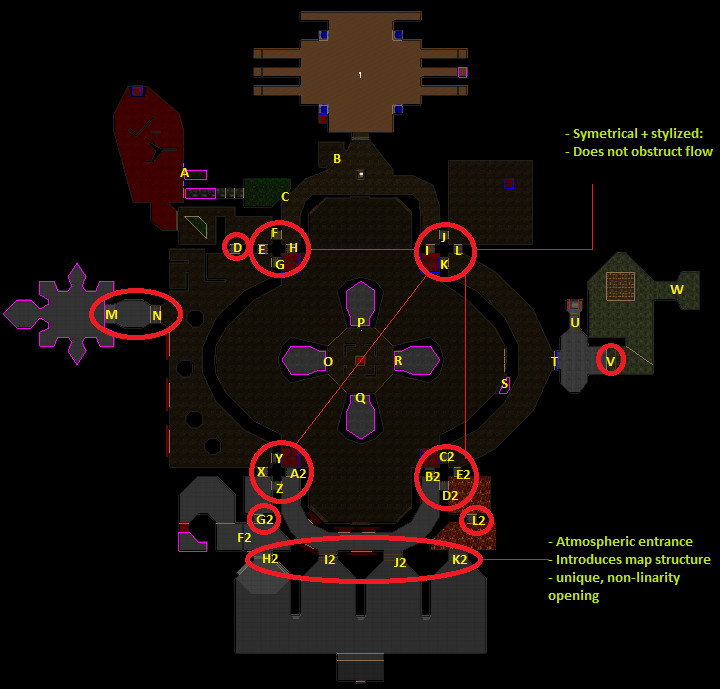 E3M5
E3M5
Unholy Cathedral has a monumental 38 doors in total, but pulls of the impressive feat of not having a single one of these standard doors interfere with the flow of gameplay. This is because they are not at all spread out, unlike in E2M5 or 6 for example, and are in fact grouped strictly with regards to map layout. Each group of four, central doorways links the corners of the map to the centre, and the player is able to deduce extremely quickly because of the remarkable structure of the map just where all the doors will lead, and how to navigate from one corner of the map to the other. In an instant, almost all of the doors in the map are less an obstruction and more an indicator of where to go. It is the perfect example of how best to combine symmetry with door usage while still giving the impression of having ample space to run around in and a clear sense of location and baring.
Also important to note are the first 4 doors in the map which allude to the maps structure and means of progression before the player has even made a move. After passing through one doorway and observing the way in which the map curls around the centre, the player, just as before, is able to develop an idea of where those other doors might lead.
Other doors:
- Secret doors [A] and [F2] are marked not by any offset, but by their positioning between two symbols. This is an interesting design motif that is usually unseen in other wads, where it is preferable to have decorations, lighting or texture variation give away a secret location.
- Doors are substituted twice in this map for another unique design motif involving the simultaneous raising and lowering of interlocking bars to allow passage. Both examples (in the north and northwest areas) lead to areas of the map that are somewhat distinct from the rooms adjacent to them.
Summary
- Regular doors are used sparingly in general, though even less so in episode 1.
- Regular doors are used less in areas that see a lot of heavy traffic, where other design motifs such as height and direction are used to separate areas and retain flow.
- They are mostly used as area dividers and for combat control rather than for aesthetic purposes, although in Petersen's case the two can be made to cooperate under a highly stylized motif.
- Irregular doors (secret doors; key doors etc) are exempt from following any strict rule set, and may be used freely as long as they adhere to strong connectivity.
- Petersen loves using doors to compartmentalize areas both central and extraneous to map progression.
Lifts
It might seem a trivial subcategory to go under Layout and Structure, but there’s a considerable difference between how lifts are used in most modern maps and how lifts are used in id’s. In Doom’s case, most lifts are not used for rescuing players from slime pits, for instance, or for entirely separating areas such as is the case with doors. Instead, they function as dividers within an area, as an atmospheric piece, or again as a means to control the flow of combat. Crucially with regards to this last point, the speed at which they rise or lower can make them a unique tool for forcing a player’s stay in a combat scenario, whereas a door might allow an easier escape. Lifts, like standard doors, are not all that common in Doom.
Let’s take a look at a few of the ways in which lifts are used in Doom, to what effect, and in what ways they might be exclusive to each episode. If at all.
The Raised Platform:
This is a basic technique which is commonly used in Doom, and especially in the first episode. Simply put, it is a lift that doesn’t lower or raise the player into an area that is out of sight when viewed from the top/bottom. While all lifts in Doom are technically “raised platforms”, this name is meant to signify the fact that many lifts do not really separate different areas, and can be seen more as a means to get from one part of an area to another (If we are to pinpoint what exactly is meant by “area” in this case, we can suppose that it is in most instances the movement from one distinct location to another via a sort of geometric standard in connectivity - doors, teleporters, connecting lifts, hallways/tunnels etc.), often accompanied by a shift in visual style. In episode 1 they will often take the player to a ledge, doorway or dead-end rather than leading them to another part of the base.
Here are a few examples of the raised platform type as seen in Doom. Please skip to the summary of this chapter to view some of the discrepancies in lift use between episodes:
Example #1
At the top of both lifts featured near the starting area of E1M2 is a ledge. The ledges themselves cannot really be considered a separate area, and although the area surrounding the lifts at the lowest point is probably too small to be considered an area either, the lift does not raise the player into a area which could not be seen by the player prior to being stepped onto.
Example #2
Again in E1M5 and 6, we see more raised platforms. However, both of these lead immediately to doors rather than ledges, though all 4 examples showed so far lead to places that are incredibly small by themselves. If we are to count in such examples as the lift next to the secret exit of E1M3, the chaingun secret in E1M3, the blue L shaped ledge reached from the lift in E1M4 and the yellow key area of E1M7 (as well as behind the yellow doors), we begin to see how, as previously mentioned, many if not the majority of lifts in episode 1 take the player into some sort of cul-de-sac or doorway.
Example #3
E2M4 is one of the few maps in episode 2 that actually features lifts, so when we are discussing how they are used between episodes it’s worth keeping in mind that if they are to be used at all, this is probably the best map from which to draw principle. The raised platform lowering into the circular pit here is similar in a way to the non-raised platform - or closed lift - that is used at the end of E1M2 (see below). In this case, a switch needs to be pressed in order to lower the lift, and its functioning as both an atmospheric piece and as a way to prevent the player from escaping quickly the many Barons and Cacodemons is affirmed (note too the spinal texturing).
All the lifts in this map are raised platforms, and two of them lead into symmetrical areas. It is similar to Petersen's E1M8 in that the room of symmetry is aligned with a lift, but different in that one lift is "closed" and the other is not, a point which could either show the triviality of differences between the proposed lift types or the further tension gained by sealing the player from view of the Baron's lair.
The Closed Lift:
There certainly aren’t many lifts of this sort. Unlike the raised platform, the closed lift is encased by wall from all sides bar the point of entry (prior to being stepped onto). It blocks the player from view of its destination, which can be incredibly useful in such circumstances as the aforementioned E1M8 or E1M2, as shown below, where the mapper intends to surprise or bewilder the player as they are struck by new surroundings. Closed lifts are perhaps the best example of how lifts may be used to separate areas in a similar way that many doors do, and so to that end whether or not the player uses it is a matter less to do with blocking the player's view but maintaining a sense of diversity in tight spaces.
Example #1
E1M2’s descending lift toward the end of the map is perhaps the best known example of this lift type. It forces the player into a somewhat difficult situation, and intends to prevent him from escaping without at least some damage being sustained or the opposition killed. It is also accompanied by a sudden albeit analogous shift in lighting. In other words, it is intended to push the player into harms way. It may also be worth noting the introduction of remote switches as a means to open doors (disregarding the earlier secrets), which is again similar to E2M4's own introduction for lowering lifts remotely. In both circumstances the player is required to work out how to escape the sudden ambush should they opt against killing everything off.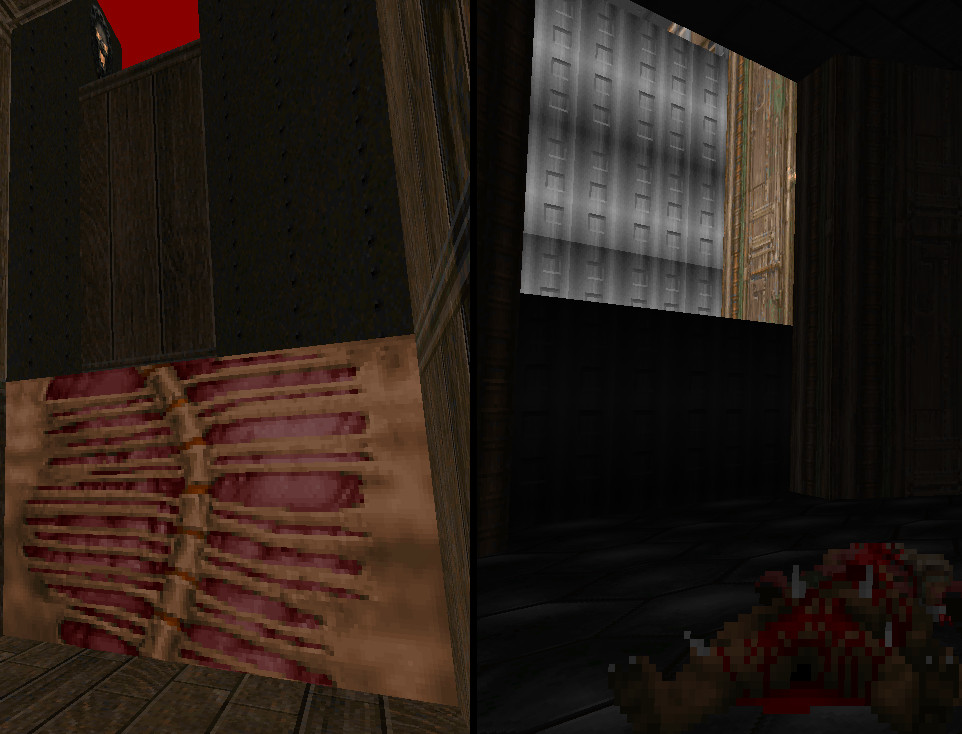 Example #2
E3M3’s closed lift has no monsters waiting at the bottom. Nor does it have any real shift in lighting or effect. It simply stands to segregate the areas in their style. The dual stairwells that branch from the symmetrical wooden area close to the start represent a similar shift, but if we are to consider the geometry here we might also suppose that the lift was opted for to conserve space and retain variety: something this map does particularly well on the whole. Again, it’s use is somewhat experimental, and it lends the purpose of the closed lift to the mapper’s discretion, if not at all proving it to be hopelessly negligible.
The Doorlift:
Exclusive to E3M1, the mighty doorlift is as its name implies: a door that lowers as a lift rather than raises as a door. It is difficult to provide any explanation as to why this trick is performed other than to say that it was probably intended to freak out the player a little bit. “Now you’re really in Hell!” sort of thing.
Summary
- Episode 1 consists of many “raised platform” style lifts, and the majority of lifts in episode 1 take the player into either a cul-de-sac, ledge or doorway of some kind.
- Petersen uses lifts considerably less than Romero, but uses doors considerably more!
- Petersen seemingly does away with Romero's tendancy to use lifts as dividers rather than gateways to new areas - regardless of type
- Episode 2 has almost as great a lack of lifts as episode 3. The few that are seen are followed either by areas of symmetry or violence, or function simply as raised platforms without the first episode's trait of leading the player to a dead end or door. The lack of lifts allows for a bit of variety as to how they should be used here.
- Episode 2 introduces switches as a means to lower lifts.
- With the slightly ambiguous use of the “closed lift” in E3M3 and the use of the mighty "doorlift" in E3M1, Episode 3’s use of lifts, though limited, reveals the more aesthetic principles underlying the unequivocal quirkiness of Hell. Even more so than episode 2 thanks to the abstractedness in design, the mapper is free to experiment with lifts as long as the number of lifts used remains... well, close to zero.
Teleporters
Doors and lifts exist. This much is true. But because teleporters don’t yet exist, were relatively new inclusions to the virtual gaming world on account of its being so young, and because Doom is a game of emersion, how teleporters are presented even before the considering of their use with regard to layout and structure is critical to their implementation. This chapter covers both how they are presented and how they allow the player alternative (or necessary) means of navigation. The two never seem to correlate, but they are of equal importance.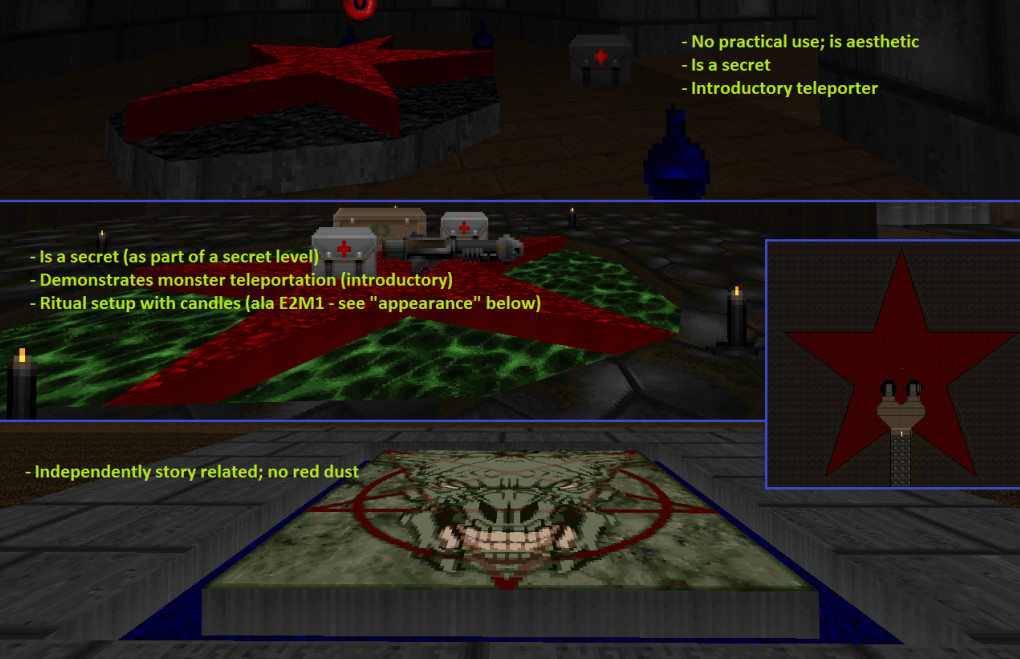 Episodic Differences
With only two of the three teleporters featured in Knee-Deep in the Dead being usable by the player, and only one of those two taking the player to a location that won’t see him torn to tasty strips in a matter of seconds, it might seem at first reasonable to say that the role of teleportation in episode 1 is negligible. Quite to the contrary however, the inclusion of teleporters in episode 1 is of great importance because of its being central to the story of the game. Having a teleporter feature in a secret area of Phobos Labs demonstrates clearly the intended experimental nature of teleportation in this episode, as does perhaps the red cobble texture for representing the “red dust” over which the anomalies were built; so explained in the Doom Bible. Clearly its use here is aesthetic and does not in any drastic way alter gameplay or change the means by which one might realistically navigate the map, but it remains relevant to the story, and in that sense necessary to making any mock Knee-Deep in the Dead episode a complete one; provided an identical storyline.
With The Shores of Hell and Inferno episodes teleporters are used primarily as gameplay devices central to map layout and navigation. Between both of these episodes little difference can be seen, but there are a couple of things worth mentioning. Much like the lifts in episode 3 being used more experimentally, teleporters here seem almost to transcend any set of rules that they should follow with regard to their appearance (see below). Presumably, this is because the laws of reality in Hell are suspended, and teleportation is a slightly less remarkable or perhaps even naturally occurring phenomenon that merely requires a lesser means of establishment (a plain texture). Consider, for instance, the Demon in E3M6 that teleports just a few feet upon sighting the player in the wooden building to the east.
Episode 3 teleporters are often one-way, in addition, and in E3M6 will typically take the player to a destination which is visually bare of teleport markings. We could claim this to be something unique to an outdoor setting in Hell or as a result of an increase in teleport permissibility due to there being a Hell, or we could simply put it down to preference and allow unremarkable teleport destinations to occur in any episode 3 environment.
Finally, episode 2 teleporters often give the impression - through the various shifts in design that the 3rd episode often lacks - of being either manmade or demon made (again, see below under “appearances”). This strengthens the concept of the Deimos base undergoing demonic subversion. The Dumbbell Complex
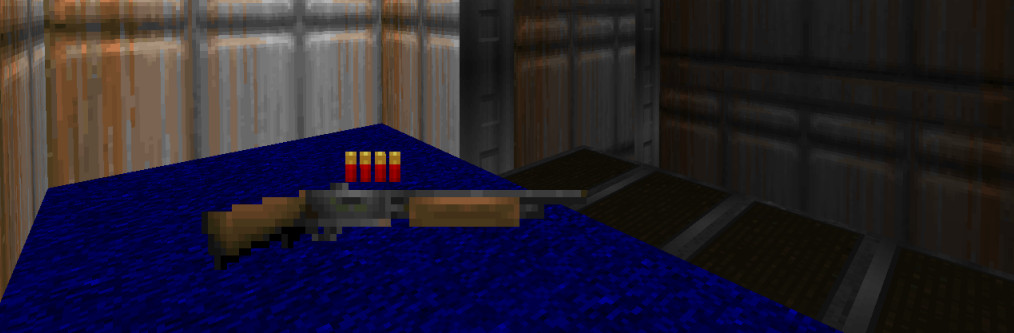
Now then. Call me an inadequate wordsmith, but it’s true what they say about pictures. Here’s one of them now!
Harmless looking enough, isn‘t it? But just in case you don’t yet have a strong enough idea of how teleporters are used (turbo pun!), or haven’t quite gotten to grips with how they are presented, here’s a pretty handy analogy for you to memorize:
Teleporters in Doom are never used trivially except in the sole case of E1M5 - for reasons I hope have been made clear enough. Episodes 2 and 3 really focus on using them primarily as integral gameplay elements, but that isn’t to say that they completely disregard their impressive implications. Remember that the idea of teleportation was a great deal more popular in the 90’s in the realm of science fiction, hence its inclusion, and to have the player merely teleported from one side of a room to another - for however practical a reason - wasn’t doing it justice.
You really had to go places.
Where does the dumbbell come in then? If we assume that each weight on a dumbbell is representing an entirely separate area in a Doom map, and that the handle between the two weights is the line of teleportation, then we can apply this image to every single use of teleportation in the entire game and find that both the point of departure and the destination lie in separate areas and that the analogy holds true - with just one exception (that exception being E3M5. We can call this a “Waffleport” or a piece of Swiss Cheese if you prefer. I’ll let you figure out why). Obviously this is a super typical use of teleporters and isn’t anything at all unique to the stock maps, but it needs mentioning because of how the respective areas are designed aesthetically with relevance to this original “idea” of teleportation. In exaggeration it would be the difference between teleporting from the Himalayas to the Amazon in one instance and a living room to a lounge room in another. There are, interestingly, many ways in which we can show this without the need for silly dumbbell analogies, although it would require digging into far less objective grounds...:
First Impressions
What do you want the player of your map to see when they arrive at the other side of your teleporter? Reminding ourselves of the “closed” lift type which encourages a greater shift in atmosphere or pace of play due to a sudden revealing of information (E1M8; E1M2), the teleporter will unfailingly thrust the player into a new bearing. It’s what the player sees first off that causes me to draw this comparison with the closed lift, as this can promote a greater sense of shift in an area even if it is otherwise pretty similar.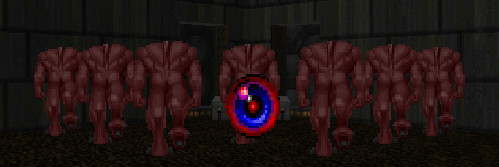 Case in point is this teleporter in E3M5. Instantly your movement stops. You click into a different mode. You can’t just barrel through these idle Demons without getting munched on. Note however that the room is otherwise fairly ordinary. More ideally the shift in geometry would be pretty considerable, but this is an effective way to take good advantage of the sudden shift while keeping consistent with the Doom design. Put something of value to see right at the immediate, and to be even more effective make it more than just visual impact. If you can change the player’s train of thought or pace of play, you’ve bagged yourself a real winner.
Other examples include E2M1’s Demon ledge, E2M5’s Lost Soul surround (secret), and E2M4’s scrolling face texture (note that this texture had not been used up until this point).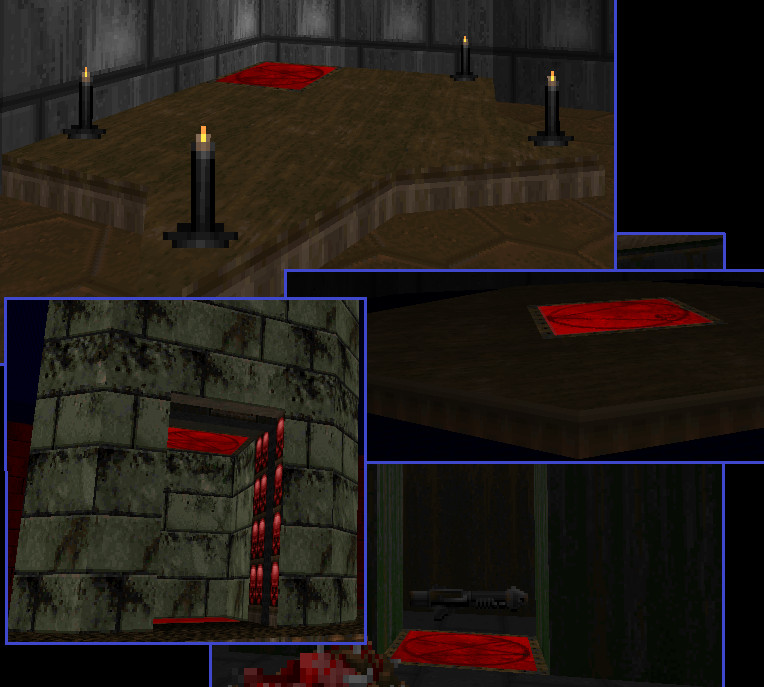 Appearance
The appearance of the Doom teleporter is an important one, and not something that is restricted to mere texture selection. Geometry is vitally important, and it’s evident that the game designers were interested in having teleporters thought of not simply as a set of linedefs for the player to step over but as physical world objects / setups - like doors and lifts. Episode 1’s teleporters are obvious examples of this with their five point stars (the scientists behind them possibly (un)intentionally emulating a necessary demonic design), but let’s look at some of the latter cases:
E2M1’s first teleporter is an immediate departure from those couple seen in the first episode, but not just in its size, shape and texture. There are candle decorations surrounding it for starters, giving the air of a ritual having taken place, and there is a mock star shaped step as well, which could easily mean to be a makeshift mound of some sort; something the demons might have placed in hurried preparation. E2M7’s teleporter is almost gate-like in its appearance, and is similar to the previous example in that it too appears makeshift, what with the tunnel branching off from an insignificant looking vat, as though it had been bored out in secret.
As mentioned, Episode 3 forgoes some of these design principles and opts for just having a plain teleporter texture with no real geometric feature. Admittedly E2M1 does this as well with the exception of the first, but when we consider the connection between teleportation and anomalies as presented in the Doom universe we can make sense of the fact that again, as mentioned, Hell and teleportation are fairly synonymous. The visuals can be downplayed.
Summary
- Episode 1 teleporter use is primarily aesthetic, but is also implicit in the portrayal of teleporters in the Doom storyline (experimental; mysterious etc.). They are therefore key to the identity of the first episode.
- Teleporters featured in episodes 2 and 3 take greater priority in gameplay than in the aesthetic, but do not forego the latter in favour of this gameplay; particularly in the case of episode 2.
- In almost every case, teleporters take the player to and from completely distinct areas (the dumbbell complex).
- In both episodes 2 and 3 it is important to impress the player with what is immediately seen upon exiting a teleporter, taking advantage of texture usage and monster positioning / facing in particular.
- Teleporters are thought of typically as actual geometric objects like doors or lifts are rather than just a set of linedefs.
- The previous point having been mentioned, the appearance of teleporters in episode 3 can be downplayed slightly, featuring either just the typical teleport texturing as opposed to any unique geometric feature or even no texture at all.